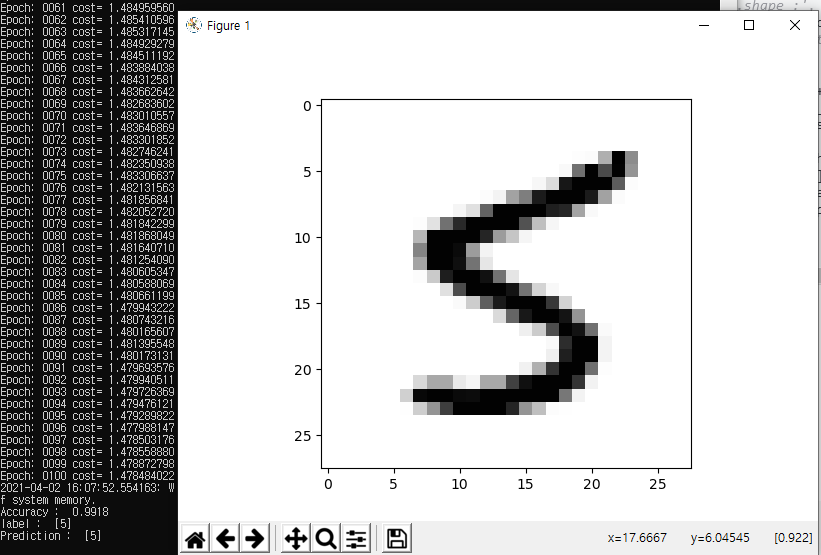
MNIST에 Convolution, Relu, MaxPool, Dropout을 추가해서 Accuracy가 99%까지 올라감
import tensorflow.compat.v1 as tf
import numpy as np

mnist = tf.keras.datasets.mnist

(train_images, train_labels), (test_images, test_labels) = tf.keras.datasets.mnist.load_data()
train_images = train_images.reshape([-1, 784])
test_images  = test_images.reshape([-1,784])
train_images = train_images / 255.
test_images  = test_images / 255.
print(train_images[0])
#train_labels = train_labels.reshape([-1, 784])
print('train_images.shape : ', train_images.shape)
#from tensorflow.examples.tutorials.mnist import input_data

tf.disable_v2_behavior()

#mnist = input_data.read_data_sets("MNIST_data/", one_hot=True)


nb_classes = 10


X = tf.placeholder(tf.float32, [None, 784])
X_img = tf.reshape(X, [-1, 28, 28, 1])
Y = tf.placeholder(tf.float32, [None, nb_classes])

keep_prob = tf.placeholder(tf.float32)

# 3x3 filter, color=1(Gray), # of Filter : 32
W1 = tf.Variable(tf.random_normal([3,3,1,32], stddev=0.01))
L1 = tf.nn.conv2d(X_img, W1, strides=[1,1,1,1], padding='SAME')
# => 입력의 이미지 크기와 같다 'SAME'이므로
# => 출력 이미지는 32개가 된다.

L1 = tf.nn.relu(L1)

#kernel size = 2 x 2
#stride : 2 x 2
L1 = tf.nn.max_pool(L1, ksize=[1,2,2,1],
                    strides=[1,2,2,1], padding='SAME')
L1 = tf.nn.dropout(L1, keep_prob=keep_prob)
#stride가 2x2이므로 28x28 이미지가 14x14가 된다.
'''
Tensor("Conv2D:0", shape=(?,28,28,32), dtype=float32)
Tensor("Relu:0", shape=(?,28,28,32), dtype=float32)
Tensor("MaxPool:0", shape=(?,14,14,32), dtype=float32)
'''
#첫번째 Convolution Layer의 출력 : 14(가로)x14(세로)x32(이미지 갯수 = 필터 수)


#input : (?,14,14, 32) #Filter : 64
W2 = tf.Variable(tf.random_normal([3,3,32, 64], stddev=0.01))
L2 = tf.nn.conv2d(L1, W2, strides=[1,1,1,1], padding='SAME')
#Conv : (?,14,14,64)
L2 = tf.nn.relu(L2)
L2 = tf.nn.max_pool(L2, ksize=[1,2,2,1], strides=[1,2,2,1], padding='SAME')
#Pool : (?,7,7,64)
#Pool : (?,7,7,64)
#L2 = tf.reshape(L2, [-1, 7 * 7 * 64])
L2 = tf.nn.dropout(L2, keep_prob=keep_prob)

'''
Tensor("Conv2D_1:0", shape=(?,14,14,64), dtype=float32)
Tensor("Relu_1:0", shape=(?,14,14,64), dtype=float32)
Tensor("MaxPool_1:0", shape=(?,7,7,64), dtype=float32)
Tensor("Reshape_1:0", shape=(?,3136), dtype=float32)
'''

W3 = tf.Variable(tf.random_normal([3,3,64, 128], stddev=0.01))
L3 = tf.nn.conv2d(L2, W3, strides=[1,1,1,1], padding='SAME')
#Conv : (?,14,14,64)
L3 = tf.nn.relu(L3)
L3 = tf.nn.max_pool(L3, ksize=[1,2,2,1], strides=[1,2,2,1], padding='SAME')
#Pool : (?,7,7,64)
#Pool : (?,7,7,64)
L3 = tf.nn.dropout(L3, keep_prob=keep_prob)
L3 = tf.reshape(L3, [-1, 128 * 4 * 4])

W4 = tf.get_variable("W4", shape=[128*4*4, 625])
b4 = tf.Variable(tf.random_normal([625]))
L4 = tf.nn.relu(tf.matmul(L3, W4) + b4)
L4 = tf.nn.dropout(L4, keep_prob=keep_prob)

W5 = tf.get_variable("W5", shape=[625, 10])
b5 = tf.Variable(tf.random_normal([10]))

#batch_xs, batch_ys = mnist.train.next_batch(100)

hypothesis = tf.nn.softmax(tf.matmul(L4, W5) + b5)

cost = tf.reduce_mean(tf.nn.softmax_cross_entropy_with_logits(logits=hypothesis, labels=Y))
optimizer = tf.train.AdamOptimizer(learning_rate=0.0001).minimize(cost)

#cost = tf.reduce_mean(-tf.reduce_sum(Y * tf.log(hypothesis), axis = 1))
#optimizer = tf.train.GradientDescentOptimizer(learning_rate=0.05).minimize(cost)

prediction = tf.argmax(hypothesis, 1) #예측한 결과를 0~6사이의 값으로 만든다
is_correct = tf.equal(prediction, tf.argmax(Y, 1))#예측한 결과와 Y 데이터를 비교
accuracy = tf.reduce_mean(tf.cast(is_correct, tf.float32)) #이것들을 평균낸다

training_epochs = 100
batch_size = 100

import matplotlib.pyplot as plt
import random

#'''
with tf.Session() as sess:
    sess.run(tf.global_variables_initializer())

    for epoch in range(training_epochs):
        avg_cost = 0
        total_batch = int(train_images.shape[0] / batch_size)

        for i in range(total_batch):
            s_idx = int(train_images.shape[0] * i / total_batch)
            e_idx = int(train_images.shape[0] * (i+1)/ total_batch)
            #print('s_idx : ', s_idx)
            #print('width : ', width)
            batch_xs = train_images[s_idx : e_idx]
            batch_ys = train_labels[s_idx : e_idx]
            #print('batch_xs.shape : ', batch_xs.shape)
            #print('batch_ys.shape : ', batch_ys.shape)
            #Y_one_hot = tf.one_hot(batch_ys, nb_classes)
            Y_one_hot = np.eye(nb_classes)[batch_ys]
            #print('Y_one_hot.shape :', Y_one_hot.shape)
            _,c = sess.run([optimizer, cost], feed_dict={X:batch_xs, Y:Y_one_hot, keep_prob:0.5})
            #print('total_batch : ', total_batch, ', c:', c)
            avg_cost += c / total_batch

        print('Epoch:', '%04d' % (epoch+1), 'cost=', '{:.9f}'.format(avg_cost))
    Y_one_hot = np.eye(nb_classes)[test_labels]
    print("Accuracy : ", accuracy.eval(session=sess, feed_dict={X:test_images, Y:Y_one_hot, keep_prob:1}))

    r = random.randint(0, test_images.shape[0] - 1)
    print('label : ', test_labels[r:r+1])
    print('Prediction : ', sess.run(tf.argmax(hypothesis, 1), feed_dict={X:test_images[r:r+1], keep_prob:1}))
    plt.imshow(test_images[r:r+1].reshape(28,28), cmap='Greys', interpolation='nearest')
    plt.show()
#'''
'딥러닝' 카테고리의 다른 글
| [KERAS] 콜백 - Callback (0) | 2021.10.30 |
|---|---|
| [KERAS] 학습시 검증데이터 세트 이용 유무 (0) | 2021.10.29 |
| 다시 실습해보는 모두의 딥러닝(1) - Lab7(MNIST) (0) | 2021.04.02 |
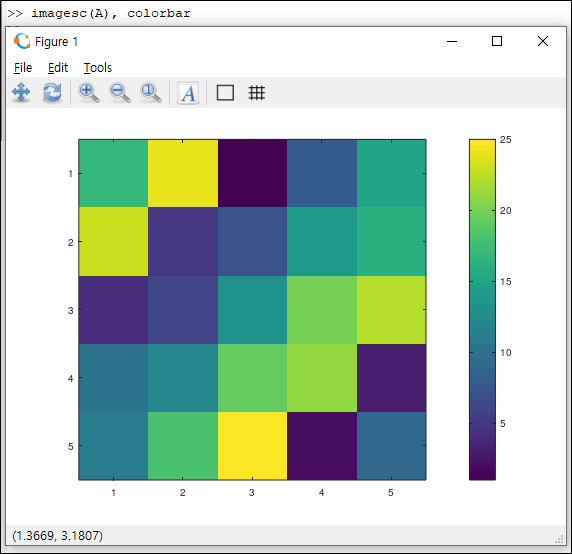
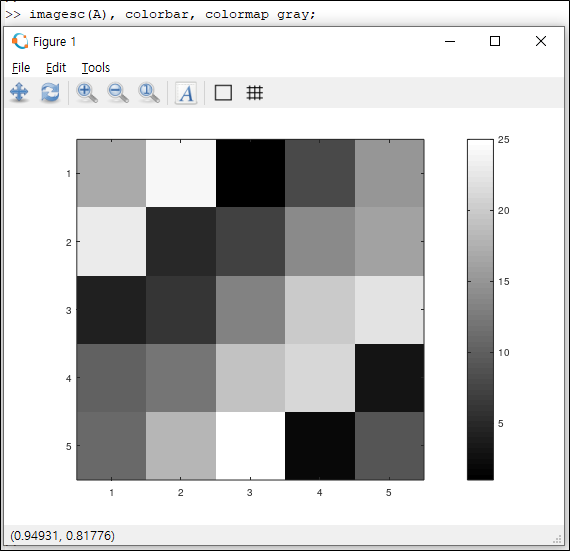
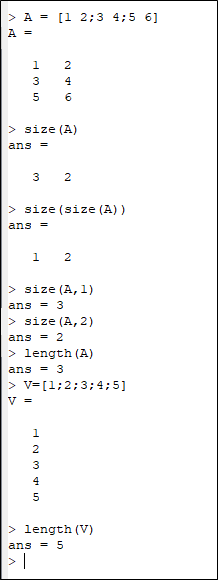
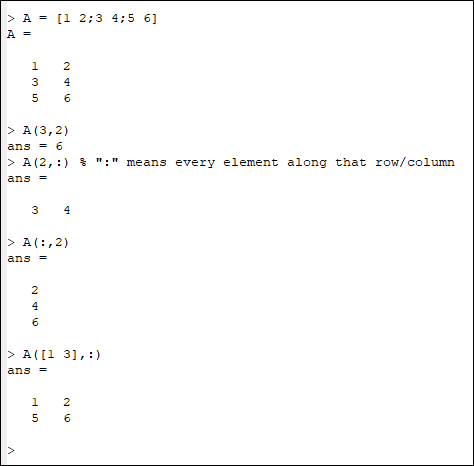
| Octave 실습정리 4 (0) | 2021.03.16 |
| Octave 실습 정리 2 (0) | 2021.03.15 |